Tostadas de Tinga de Pollo recipe.

Before I moved out, I only knew how to prepare a small handful of dishes. Little by little, I began experimenting with recipes and started trying to create my own. After many failed attempts, I started getting the hang of it. Now I truly believe that anyone can cook, you just have to TRY!

Now that I’m a mom, I love making easy dishes that don’t take too much time. That is why I love making Tinga. Tinga is one of the easiest things to cook, and it’s not too time consuming if you prep everything ahead of time. Such as boiling the chicken (always save your homemade broth!), slicing the onions, and shredding the lettuce!

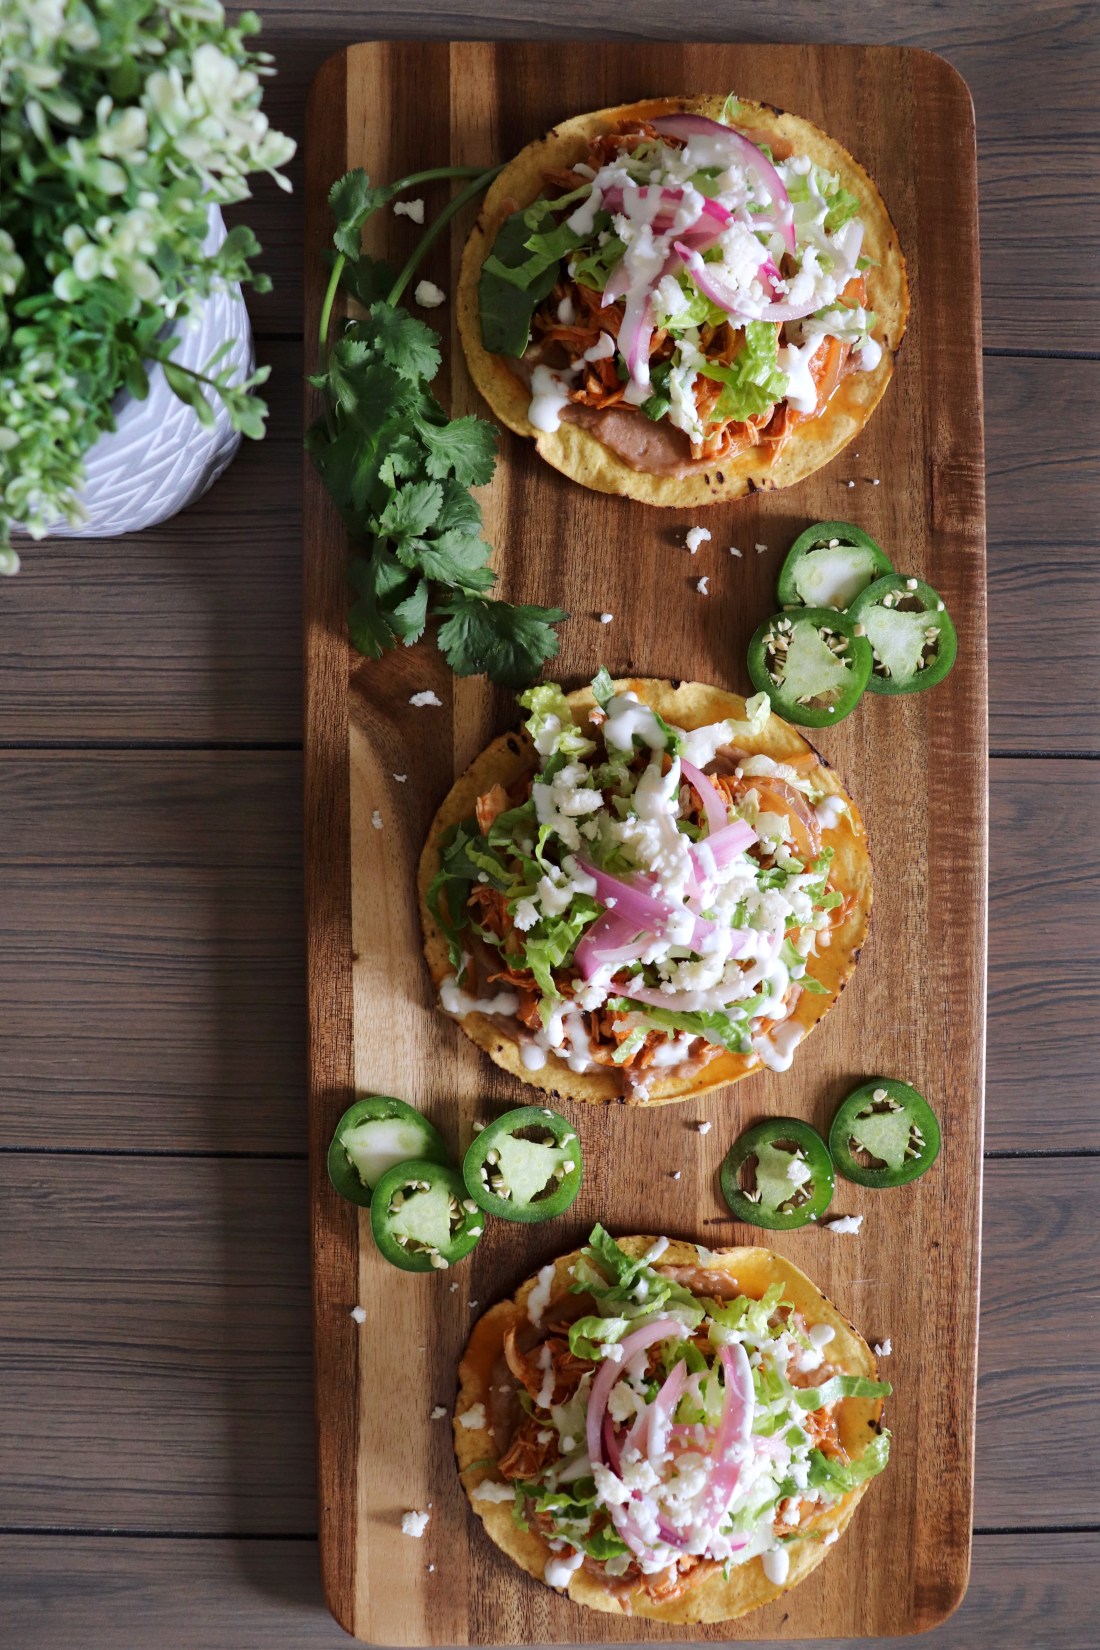
Tinga de Pollo is a Mexican dish, made of shredded chicken (pollo translates to chicken) in a Chipotle adobo sauce. It it warm, spicy, slightly smoky, and incredibly delicious! Tinga is typically served on a tostada with a spread of refried beans. To be more specific, you grab a tostada add a layer of refried beans, a layer of the chicken Tinga, then top it with shredded lettuce, pickled onions, sour cream, and Queso Fresco. The toppings really add so much flavor, and a fresh crunch and taste to the tostada.

With that said, here is my recipe:

Ingredients:

  • 4 large chicken breasts (boiled & shredded)
  • 4 cups of chicken broth
  • 3 tomatoes
  • 1 7oz can of chipotles in adobo
  • 1 7 oz can of tomato sauce
  • 2 large peeled garlic cloves
  • 2 large white onions (peeled & sliced)
  • Chicken bouillon or salt to taste
  • Tostadas
  • Refried beans (optional)

For topping-

  • Shredded lettuce
  • Pickled onions
  • Queso fresco
  • Sour cream

Instructions:

  1. In a blender, add tomatoes, chicken broth, chipotles, tomato sauce, garlic cloves, chicken bouillon, and blend until smooth.
  2. In a large lightly oiled pan, add sliced onions and cook on med-high for 2 minutes or until almost translucent.
  3. Once the onions are done, add all of the shredded chicken along with the onions .
  4. Next, pour all of the sauce into the pan, and mix until the chicken and onions are coated.
  5. Cover the pan, and simmer on low heat for 20 minutes. After 20 minutes, turn off the heat remove the lid and you are ready to serve!

Now comes the fun part- eating it! Enjoy!

PicassoTiles- A fun and educational set for kids.

It’s the season of giving, and today I wanted to share with you a gift any child would love.. PicassoTiles! PicassoTiles is a toy and shape building set that focuses on STEAM education.

STEAM stands for Science, Technology, Engineering, Art, and Mathematics. With these magnetic tiles, kids are able to craft 2D and 3D shapes, learn about color, shapes and even counting! Children can be creative, and follow the picture provided on the box as a building guide, or use their imagination and create whatever they would like.

PicassoTiles actually sent us this Ferris Wheel set a few weeks ago, and my kids have probably played with this almost every day since. We also own another one of their sets which we have had for over a year now and it’s still often played with (and it perfect condition, I must say!). These tiles are built to last! My kids are very reckless when it comes to playing, so if a toy lasts over a year in our house then it must be pretty great.

Another favorite of ours are their DIY take apart trucks. They are the perfect toys for a toddler boy or girl! Since they do have some small pieces (such as the plastic screws, etc.), I’d say they are ideal for ages 3 and up. Christian often brings out his construction truck and fire truck and begins taking them apart just to put them back together. It’s fun for him, and it also helps him strengthen and use his fine motor skills as well.

In this era of technology, I believe it is important for our children to have educational toys that will captivate their interest and challenge their minds. Our kids are like sponges, they soak up everything we feed into their minds. Why not feed them knowledge in any way that we can?

With that said, I will provide the links for the PicassoToys down below. Let me know if PicassoTiles made it on to your child’s Christmas gift list. Happy Holidays!

Ferris Wheel Set:

PicassoTiles PT62 Kids Toy Building Block Ferris Wheel Set LED Light Children Construction Kit Magnet Tiles https://www.amazon.com/dp/B0114AB4OU/ref=cm_sw_r_cp_api_i_toXfCbH425DTZ

DIY Take A Part Construction Truck Set:

PicassoTiles DIY Take-A-Part Construction Truck Toys Car Set Bulldozer Dismantling Toy Building Kit with Child-Size Safe Large Parts, Reversible Screw Driver Nuts & Bolts PTT301 (Bull Dozer) https://www.amazon.com/dp/B07BGY741Z/ref=cm_sw_r_cp_api_i_BsXfCbAB5NXQF

Sausage & Cheese Stuffed Shells recipe.

I am back, and with another recipe. Yesterday I posted on my Instagram story a picture of some stuffed shells I was making, and I got a lot of messages asking for a recipe. So, I thought- it’s time to bring out my laptop and share with you all another delicious recipe!

First off, let me just say that I have never cooked or eaten stuffed shells before. I am not sure what the correct way of making them is, but this is how I made them. According to my husband and one of the pickiest eaters I know (my daughter Scarlett) they were yummy! My husband probably ate ten shells in one sitting, and woke up this morning asking for leftovers. I had some yesterday, and also this morning and they reheat very well. Therefore, you can cook this in advanced and reheat the next day for a dinner party, or whatever you’d like.

These shells are stuffed with a creamy ricotta cheese mixture, sausage and veggies of your choice. I chose to add mushrooms and spinach because I love mushrooms, and because I had a huge bag of spinach I needed to use up in my refrigerator. You can omit any vegetables, or you may also omit or replace the sausage with a plant based meat for a vegetarian dish, which would also be delicious! As for sauce, you can use anything you’d like. I have seen recipes using Alfredo sauce instead of marinara. Pesto would work great too, or combine Alfredo sauce and pesto for a creamy pesto sauce. YUM!

If your oven has a broiler, make sure to broil your shells after they’re baked for a beautiful golden brown cheesy crust. It will make your dish look even more appetizing. Unfortunately my broiler is not working, otherwise I would have the beautiful crust I’m talking about. 😦

Now without further ado, here is the recipe for Sausage Stuffed Shells.

Ingredients:

  • 1 12 oz box of jumbo shells
  • 1 lb ground Italian sausage
  • 8 oz sliced mushrooms chopped
  • 2 cups spinach
  • 30 oz ricotta cheese
  • 2 cups mozzarella cheese
  • 1 cup parmesan cheese
  • 2 eggs
  • Marinara sauce (I used a 40 oz jar of Victoria sauce)
  • Garlic salt or regular salt (add to your liking)
  • Garlic powder (to your liking)
  • Black pepper  (to your liking)
  • Dry Parsley (optional, for garnish)
  • Basil (optional, for presentation and plating)

Instructions-

  1. Boil the jumbo shells using the instructions on the box. Once cooked, gently drain the pasta and line the shells on a flat sheet to cool. Some shells might be torn, we will be utilizing the shells that are not torn. I used around 22 shells in total.
  2. Next, cook Italian sausage in a large nonstick pan on med-high heat until browned. Add all of your cleaned, chopped mushrooms into the pan with the Italian sausage and cook until softened, about 2-3 minutes. Once mushrooms are soft and cooked, add your spinach and cook until wilted. This should take less than a minute. Season this mixture with garlic salt, and garlic powder to your liking.
  3. Drain the sausage, mushrooms and spinach mixture to remove the excess fat left from the sausage.
  4. Now, it is time to work on the cheese mixture. In a large mixing bowl, add the ricotta cheese, mozzarella cheese, parmesan cheese, 2 eggs, garlic salt, garlic powder, black pepper and dry parsley and mix until it is all combined.
  5. Once the sausage mixture is cool, add it into the bowl with the cheese mixture and gently mix until it is all combined.
  6. In a 9×13 baking dish, add marinara sauce to your liking. I added 2/3 of sauce from the jar, and used the rest in a second baking dish. I used two baking dishes to cook all of the shells.
  7. To stuff the shells, grab the pasta shell and gently open it. Using a spoon, begin adding the cheese and sausage mixture by the spoonful. Once it is filled all of the way, place it over the sauce in the baking dish. Continue doing this to the rest of the shells until done. Sprinkle more mozzarella cheese and dry parsley on top of assembled shells.
  8. Cover your baking dishes with aluminum foil, and bake at 350 degrees F for 3- minutes or until cheese is fully melted. For a golden cheesy crust, broil it uncovered for 3-5 minutes. Enjoy!

My Mom’s Champurrado recipe.

Champurrado is one of those drinks that is so nostalgic for me. I have memories walking to school when I was a little girl, and purchasing a cup of champurrado from the vendor at the corner of the street. You know the type of vendors that sell from the back of their truck or van, sometimes even a shopping cart? I swear, they always made the best champurrado and tamales. Where I live, I don’t see any tamales or champurrado vendors, so I am stuck having to make my own. I can’t say I mind, because I can adjust anything to my preference. A little more masa (corn flour), a little sweeter, or not so sweet, etc. Champurrado is a hot chocolate, but what makes it champurrado is the masa that is added.

If you have never tried champurrado, let me just explain the flavors of this Mexican beverage to you. It is a bit thick because of the masa, chocolatey, milky and sweet with a hint of cinnamon. It is a delicious seasonal drink. I say seasonal because we typically make it during the holidays and when it is cold out. The ingredients can be found at any store with hispanic options. The hardest to find may be the masa, but you can purchase corn flour and turn it into masa by adding water. I just buy a little bit of already made masa at the hispanic foods store. It is so simple to make, and also very affordable.

This champurrado recipe is my mom’s recipe. My mom is the one that has taught me to cook a lot of Mexican meals and drinks, like this one. She makes her champurrado on the runnier side, where as I like it on the thicker side! In this recipe we combined our preferences and tried to make it a good consistency for both. I love being able to taste the masa, and getting masa clumps is my favorite. That might sound a little strange, but it is so good! Remember, you can always adjust anything to your liking. If you want to take it to the next level, buy some Birote (Mexican rolls) for dipping! Below are the ingredients and recipe for this delicious seasonal Mexican drink. Do not be intimidated, I promise it is easier to make than you probably imagined!

Ingredients:

  • 1 quart of water
  • 3 Abuelita chocolate discs
  • 2 cinnamon sticks
  • 1/2 gallon of milk
  • 1/4 lb. of masa (add more or less depending on your preference)
  • 1 cup of water for preparing the masa
  • 1 can of sweetened condensed milk
  • 1 can of evaporated milk

Instructions-

  1. Add the quart of water along with 2 cinnamon stick into a large pot and boil.
  2. Once water begins to boil, lower the heat to medium, and add 3 discs of Abuelita chocolate, stir until completely melted.
  3. Next, add 1/2 gallon of milk and continue cooking on medium until it comes back to a boil, stir occasionally.
  4. While the milk is heating up on the stove, it is time to work on the masa. In a separate bowl, add your 1/4 lb of masa, and gradually add a cup water to the masa, while using your fingers or a whisk to break it up. Once you’ve finished adding the cup of water your masa should have become a smooth, but thick liquid.
  5. At this point, your hot chocolate mixture on the stovetop should be back at a boil. Now, you will slowly and carefully add your masa and water mixture into the boiling hot chocolate, all while whisking or stirring to combine and avoid clumping.
  6. Next add the can of evaporated milk, along with a can of sweetened condensed milk and stir until combined. The sweetened condensed milk will add sweetness. You shouldn’t need to add sugar, but taste it and if it does- add sugar to your taste.
  7. Lower heat to low, and simmer until it thickens up. Continue to stir occasionally so your champurrado doesn’t stick to the bottom of the pot.
  8. Enjoy!


Arroz con Leche recipe.

Hey friends! Today I bring to you my go-to recipe for Arroz con Leche, also known as Rice Pudding. Arroz con Leche has to be one of my favorite sweet comfort foods. Growing up, my siblings and I would look forward to my mom’s arroz con leche. Now, I think I’ve perfected the recipe and my way of making it is better than my mom’s.. But shhh don’t tell her that! In the photo below, I had made my arroz con leche a little bit thicker for presentation purposes, but I normally love it when it is more liquidy than dry. I will share the ingredients and recipe down below. Keep in mind, that you can tweak some of the ingredients and measurements in order to make it to your own taste and liking. I have used coconut milk instead of regular dairy milk before, and that is also super delicious. Enjoy!

6BDB9778-7B82-48CF-81BC-E83A3161DF5A

Ingredients-

  • 2 cups of long grain white rice (you may use jasmine if you’d like)
  • Water to fill half of a pot
  • 2 cinnamon sticks
  • 1 can of evaporated milk
  • 2 cans of sweetened condensed milk
  • 2 tsp of vanilla extract
  • 1-2 tbsp of white or brown sugar (measure to taste)
  • 1/2 a gallon of milk (you may need more, once again add to your liking)
  • Ground cinnamon for topping (optional)


80A1D2C3-A438-4C3B-844C-F7C550E6918A

Instructions-

  1. Fill a large pot halfway with water, and add 2 cinnamon sticks, boil on high heat.
  2. When the water begins to boil, add your 2 cups of rice and stir. Let it continue boiling, stir consistently so the rice doesn’t begin to stick to the bottom of your pot. It should take about 10-15 minutes to fully cook. There should be very little water left behind.
  3. Once your rice has cooked, and the water has almost fully evaporated, lower your heat to low. At this point you will add the can of evaporated milk and 2 cans of sweetened condensed milk. stir until combined.
  4. Next, add your 1/2 gallon of milk. Like I mentioned, add milk to your desired consistency. You may add more or less.
  5. Add 1 teaspoon of vanilla extract, and 1-2 tablespoons of sugar. Add your sugar little by little to ensure that it does not become too sweet. Taste, and add more if you would like it sweeter.
  6. Simmer on low for 10 minutes, stirring consistently.
  7.  Serve & Enjoy!

You may top with ground cinnamon for garnish and extra flavor. This recipe is a staple in our home once the weather becomes cool. I hope it will become one for you too!

The Mom behind this blog.

E7DA952A-1142-44B0-AF59-5EA3531CFCA1Hello, and welcome to my very first blog post. Well, to tell you the truth about six years ago, I started a blog to document my daughter Scarlett’s life. Just about 4 blog posts in, I stopped writing. I underestimated how time consuming raising a child would be.

At the time, my husband worked early mornings, and he was sleeping most of the day and evenings when he came home. That left me with little to no time to myself, and therefore I quit the blogging thing. Since then, a whole lot has changed. For one, I am a mother of two now. Scarlett is 6 years old, and my son Christian Luca is 4. I am a stay at home mom, and my husband works full time. He has a normal schedule now and my kids are easier to care for, so I can now dedicate time to one of my many hobbies- writing. I am an introverted, socially awkward  person who is better at writing thoughts, than speaking them. Therefore, I bring to you my newest past time… this blog!

In this blog, I plan to share some of my favorite recipes, DIY projects, product reviews, motherhood tips, and more. I have a huge passion for cooking, and that was the main reason I created this page. It is a place where I can keep my recipes all in one place, as well as share other projects, or even places to visit and things to do here in Southern California/Los Angeles. Basically, I’ll be sharing a little bit of everything in my life. I hope you enjoyed reading, and thank you so much for stopping by!

cropped-5137f8e4-be71-4d9e-a3a2-fdc548a0124f